How to Limit SSH logins by Country on Ubuntu 20.04
One very nice way to hide your SSH login from would-be attackers is to hide it. If you have been following along this guide, we have done several things to hide it, but we can (and in my opinion, should) do more. After all, the fewer chances you give someone to get lucky, they better.
Here we will look at the IP addresses of people trying to SSH in, and allow or block them based on what country those IP addresses belong to. Of course, this is not going to help if someone is using a VPN with an IP address from a country you allow, but it is one more layer of security. Are we going overboard here? Maybe, but we have watched some of our servers get attempts from hundreds of thousands bots using ip addresses from China, Iran, Russia, etc. over the years. Wouldn't it be better is they didn't get a hit, alerting someone there was a server to attempt to break into?
For quite some time, there was a very easy way to do this using a binary called geoiplookup by MaxMind. Unfortunately, in 2019 they ceased to support it, but they still have the service to keep an updated IP database on your server to use for checking for valid IP numbers by country. Better yet, a developer/blogger named Ralph Slooten created a script to replace the one published by Maxmind. His tutorial on installing the script can be seen here, but it makes some assumptions that may make getting it up and running a little difficult, so after asking him a bunch of questions, we got it running, and are sharing what we learned here.
Step 1 - Create an Account on MaxMind
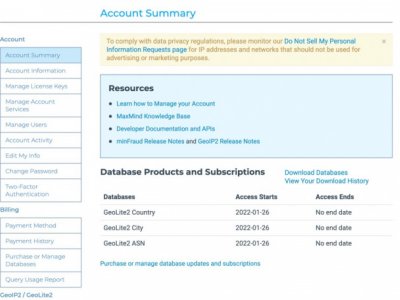
Head over to Maxmind's GeoLite2 Sign Up page. Once you sign up, you will be emailed an activation link, asked to create a password. Next, click the My Account section at the top of the page and login with your email and password. You should see a screen that looks like this:

- Click on the "Manage License Keys" link on the left-hand menu.
- Click the Generate new license key button.
- On the next page, name your key
- Where you see: Old versions of our GeoIP Update program use a different license key format. Will this key be used for GeoIP Update? , mark the YES radio button.
- Select Generate a license key and config file for use with geoipupdate version 3.1.1 or newer.
- Finally, click the CONFIRM button.
You will now see your new license key. It will look something like this:
Account/User ID: 123456
License key: XXXXXXXXXXXXXX
Copy this info and store it somewhere safe. You will need this during this tutorial and in the future.
- Click the Download Config button to download the configuration file to your computer. Again, you will need this later.
You can now close the browser.
Step 2 - Install GeoIP Update
This is the program that will download database updates with new data for IP lookups. MaxMind provides a PPA for recent versions of Ubuntu. To add it to your sources, run:
$ sudo add-apt-repository ppa:maxmind/ppaNow update and install:
$ sudo apt update$ sudo apt install geoipupdateNext we need to edit the configuration file:
$ sudo nano /etc/GeoIP.conf- Change the AccountID in the file to the Account ID from Step 6.
- Change the LicenseKey in the file to the Account ID from Step 6.
- In the section that says EditionIDs, remove everything except GeoLite2-Country
Now save the file by hitting [CTRL-X] then Y, then [ENTER]
Now we need to quickly execute it to download our first database:
$ sudo geoipupdateNext we need to create a cron job so the database updates automatically:
$ sudo crontab -eYou will be asked to select an editor. Choose #1 (/bin/nano) and hit [ENTER]
At the end of the file enter the following:
30 2 3 * * /usr/bin/geoipupdateThis will cause the database to update at 02:30 AM, on day 3 of each month.
Step 3 - Install GoIPLookup
To begin,, this tutorial assumes your server is on an AMD64 architecture, but let's make sure:
$ dpkg --print-architectureYou should see:
amd64If not, you may need to make some changes as appropriate in this step.
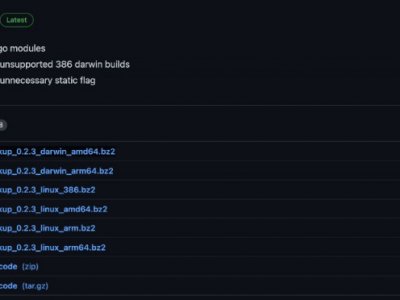
First, open a web browser and go find out what the most recent release is of goiplookup. Again, many thanks to Ralph Slooten for this!

At the time of this writing, the current version is 0.2.3, and as mentioned above, I am using a VPS running Linux with AMD64 archtecture. So the file I want here is:
goiplookup_0.2.3_linux_amd64.bz2If you see a newer version, in the steps ahead replace goiplookup_0.2.3_linux_amd64.bz2 with the filename you see on the github page. For all further examples, I am using version 0.2.3.
Download the file:
$ sudo wget https://github.com/axllent/goiplookup/releases/download/0.2.3/goiplookup_0.2.3_linux_amd64.bz2Unzip it:
$ sudo bunzip2 goiplookup_0.2.3_linux_amd64.bz2Give it permissions to execute:
$ sudo chmod 775 goiplookup_0.2.3_linux_amd64And move it to it's final home!
$ sudo mv goiplookup_0.2.3_linux_amd64 /usr/local/bin/goiplookupNow let's make sure it is working:
$ goiplookup 8.8.8.8You should see the following output:
GeoIP Country Edition: US, United StatesNow let's delete the archive we downloaded
$ sudo rm goiplookup_0.2.3_linux_amd64* Note: the filename will be different if you downloaded a different version.
Step 4 - Create the GoIPLookup Script
As mentioned earlier, this script was made by Ralph Slooten , and thsi tutorial is adapted from his tuorial here. He helped me with some of the questions I had that prompted me to write this more extensive tutorial.
He wrote a simple shell script which returns either an true (ACCEPT) or false (DENY) response. If the result is DENY, it logs to the system messages using logger.
So let's create the script:
$ sudo nano /usr/local/bin/sshfilter.shIn the file, paste the following:
#!/bin/bash

# UPPERCASE space-separated country codes to ACCEPT
ALLOW_COUNTRIES="US CA IT"

if [ $# -ne 1 ]; then
  echo "Usage:  `basename $0` <ip>" 1>&2
  exit 0 # return true in case of config issue
fi

COUNTRY=`/usr/local/bin/goiplookup $1 | awk -F ": " '{ print $2 }' | awk -F "," '{ print $1 }' | head -n 1`

[[ $COUNTRY = "IP Address not found" || $ALLOW_COUNTRIES =~ $COUNTRY ]] && RESPONSE="ALLOW" || RESPONSE="DENY"

if [ $RESPONSE = "ALLOW" ]
then
  exit 0
else
  logger "$RESPONSE sshd connection from $1 ($COUNTRY)"
  exit 1
fi
Note the line that shows ALLOW_COUNTRIES="US CA". You will want to change that to allow people to SSH into yoru server only from countries you list here. In the example above, we are allowing logins from The USA and Canada. But if you only want to allow SSH from IP numbers within The United States, you would have ALLOW_COUNTRIES="US". If you wanted to allow only people from IP numbers in United Kingdom and France, you would use ALLOW_COUNTRIES="GB FR". (Great Britan and France).
Whichever countries you want, you will want to use the two letter ISO country code(s), which can be found here.
If someone tries to SSH into your server using an IP for which the country cannot be determined, this script will allow it in, since it cannot tell. This allows internal IP addreses on your local network to get in.
Now save the file by hitting [CTRL-X] then Y, then [ENTER]
Next, we need to make our script executable:
$ sudo chmod 775 /usr/local/bin/sshfilter.shStep 5 - Lock Down Our SSH
Before doiing this, make sure you have two terminal windows open just in case you make a mistake or something does not work. One terminal should be logged in and left to the side in case of emergency, and the other logged in for the work we will do now.
We will now tell the ssh daemon (sshd) to deny all connections, assuming a login cannot get in until our script says it is ok. We do so by editing our hosts.deny file.
$ sudo nano /etc/hosts.deny and add the following line:
sshd: ALLNow save the file by hitting [CTRL-X] then Y, then [ENTER]
Next we need to edit our hosts.allow file to force it to run the script to see if a user is allowed in:
sudo nano /etc/hosts.allowand add the following line:
sshd: ALL: aclexec /usr/local/bin/sshfilter.sh %aNow save the file by hitting [CTRL-X] then Y, then [ENTER]
Step 6 -Testing
Again, make sure you have two windows logged in. We don't want to lose access if this does not work.
Go back and edit sshfilter.sh:
$ sudo nano /usr/local/bin/sshfilter.shNow take your country out of the list of allowed countries.
Now save the file by hitting [CTRL-X] then Y, then [ENTER]
Now reload the sshd service:
$ sudo systemctl reload sshdNow open a new terminal window and try to ssh into your server. If you are on an ip number that is not listed in the allowed counties, you will noit be able to connect.
To double check and see what happened, you can look for the denial in your logs. Go back to the terminal that is still connected to the server, and enter the following:
$ sudo grep "DENY" /var/log/syslogYou should see output something like this:
Jan 30 17:56:59 myhost root: DENY sshd connection from 99.107.131.162 (US)IMPORTANT: Now that you are done, go back and add your country to the allowed list !!!!
$ sudo nano /usr/local/bin/sshfilter.shAdd your country back in.
Now save the file by hitting [CTRL-X] then Y, then [ENTER]
Reload the sshd service again:
$ sudo systemctl reload sshdand go open another terminal window and make sure you are able to SSH into your server!
We are DONE!
Now every time someone tries to SSH into your server, they will automatically be rejected if their IP is known to be from a country you do not allow. Additionally, every month, your server will update the ip database from Maxmind. On top of this, if you followed the previous steps, your SSH is on an ambiguous port, you have Fail2Ban set up to protect you, and you have some pretty good firewall protection. Remember there is no such thing as a server that cannot be hacked, bugt by this point you are a very, very difficult target not only to hack, but to be found.
Warning: While it is great that you can lock people out by country using this method, remember that this is just one in many layers of security to use. This method can be easily thwarted if someone connects through a VPN in a country you allow. Still, they would need to know you are blocking based on country, so this will surely add a nice extra layer to make things more difficult.